
Tips & Tricks:
Here, you can post your tips and tricks. Just post by putting them in the form on the bottom of the page. Check out the tips!
(And tricks!)
(And tricks!)
Mouth Animation by inspector101
Mouth animation is one of the top items on the lists of special effects. There is a program called glueface that handles this easily. Glueface is simple. You must have two programs, Papagayo and glueface. Papagayo is simple. Just install it and open the help topics. There is a tutorial. Import your own .wav file, follow the tutorial, and export. Install Glueface. Open. In glueface, click import video. Import your uncompressed avi file. Click import data sheet. Import the saved papagayo file you exported from that program. Click import mouths. Where you download Glueface, there should come with it some Phenomes, which are the mouth systems it uses. Go to the extracted folder, and press the .mouths file, that is the only file that comes up. Simply use the tools to easily position the mouths and eyes. Click Create file. Save the file as "yourfilename.avi". You must have the .avi on the end, or it won't be a video file. In glueface, there is one thing to remember. Unless you wish to damage you minifig's head, you must turn his head around so that there is a blank yellow face. Than do your video. This means that only certain faces can work, unfortunately. Hopefully the creators of Glueface will be able to get a bigger dictionary of Phenomes to use for Glueface. The other alternative to glueface is to just go in and edit the faces with paint. But glueface can work a lot better if you take the time. Links to sites: Glueface; Papagayo. Java is required for Glueface to run. When you download Glueface, you must extract the folder. Also, the phenomes are very little. Only certain faces work. If you want to use your own faces, make your own phenomes, or just use paint.
Animator Help by inspector101
I use the windows animator most upgraded version: the sma program by anasazi. For $70, you can get this program with a complete guide on how to make a stop-motion film, a camera, and a cd with two films already included, with plenty of sounds. If you already have a camera, you can get sma online for free. But the camera they found was pretty cheap, and it has some good overlays, like a tactical binocular, and sniper scope. But doing things with animators:
1: All animators have frames per minute. Most beginners will use the default setting, 15 fps. If you do this setting with Lego, I have a list of speeds to use for certain things. The speeds are for 15 fps only. Here they are:
Walking: 3 frames for each position. Running: If using the same system as walking, 2 frames per position (fpp), but I prefer changing the type of movement. Car, slow speed: 2-3 fpp, depending on whether or not you want you have people in the movie and whether you want the car moving faster than them or not. Car, fast speed: 1 fpp. Plane: This varies, as will be shown is some effects. If the plane is moving, such as in take off, 3-2-1 fpp will be best. There are all the speeds for basic things. I have animated for about 4 years now, so if you would like to ask me for some techniques, contact me via email.
Lighting Experiences, and Tricks by inspector101
Lighting is very important. The way you put your lighting will make your movie good or bad. If you have your lighting too bright, that the scenes are all white, that's not good. If it's to low, so you can't see what you want to, that's bad as well. Good lighting makes a good film. I saw a movie once that had once that had these problems. IT was a western that wasn't stop-motion animation. It had a fight scene where the hero fights four men and gets away when they try to kill him. The fight begins with the light going out. BUMMER! There is a little scraping sound, and 5 minutes later, the four men light the lamp to find the hero gone. Bad fight scene. So, that's one thing you need to do to get good quality film. Now, the tricks are very simple. When you have a night scene, and you show a house, and they turn on the light, (here is an example below:
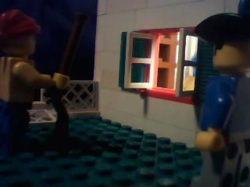
A picture from Nr-Productions Jack Spelt and the Sandstone Caves.
You can see in the picture above how they used lighting to have the light inside the house. They also had enough lighting to show the characters outside the house as well. Another trick is to get tracing paper, color it orange, and then make a lego house with a square hole about the size of the paper at the bottom. Stick the paper behind the hole, stick a flashlight turned on behind it, turn out the light, take a picture, and PRESTO! You have a photo that looks like a cozy house with a roaring fire.
I used that trick in a unsuccesful movie, and it was very nice. If you ever have a fire scene out side though, this won't work. I haven't done this, but to do an outside fire, you take colored transparent lego bricks and point a laser pointer on them while shooting film. These are a few tricks. I hope you can pick some more through experience.
I used that trick in a unsuccesful movie, and it was very nice. If you ever have a fire scene out side though, this won't work. I haven't done this, but to do an outside fire, you take colored transparent lego bricks and point a laser pointer on them while shooting film. These are a few tricks. I hope you can pick some more through experience.
VirtualDubMod by inspector101
Okay. Some people just take videos like described above, and just stick into a nle (Non-linear editor) without putting it into a movie first. I'd like to show you a better way, for those who don't have a webcam, or want to spend 50-70 dollars on an animation program. It's called, VirtualDubMod. It's simple to use for your movies. You install the program. When you take your pictures, you import them all into the computer in a sequence (picture1, picture2, etc.) and open this program. You press file < import. Select your first photo. There should be a box checked that says: import sequence photos, or something like that. Make sure it's checked. Ta-da! You now have a movie! Simply press file < export to save your movie file. But there's more. You can add effects to your movie as well. There's a filters section. This section has some simple effects. You can even add audio. It's a pretty good way to stick together a movie without much. Use the download below:
| VirtualDubMod.zip |
*All posts must be approved by us to be placed on the web. You must be a member to post.
Polls:
Search Engine: Find Articles

